The WPS Telegram Chat plugin by wpSolution is your quick way to add Telegram chat to your WordPress website! The plugin is fully compatible with WordPress and works seamlessly with any WP theme. Flexible settings and a user-friendly interface provide maximum convenience for both you and your customers.

If you’re serious about customer engagement and boosting conversions, live chat is essential. By adding a Telegram chat widget to WordPress, you can connect with visitors in real-time as they browse. Take advantage of Telegram’s large user base to let visitors reach out through their preferred messaging app.
With the Telegram button, you can offer direct support, take orders, build trust, and enhance customer loyalty. Stay connected with your audience anytime, anywhere, using Telegram integrated right on your website.

How to Setup Your WPS Telegram Chat?
A Guide for Absolute Beginners:
Step 1 - Download the Telegram App, Signup and Login

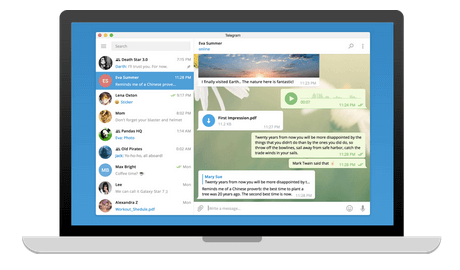
Telegram is a cloud-based mobile and desktop messaging app. You can use Telegram on all your devices at the same time — your messages sync seamlessly across any number of your phones, tablets or computers. You can download the latest version of Telegram from the links below:
Download for Windows, Mac, Linux
Download from App Store for iPhone, iPad
Download from Google Play for Android
Telegram is predominantly a mobile app, but you also need to install it on the same machine you’re using for make website settings. So you’ll be able to copy your Telegram bot’s API key from the Desktop App and paste in the website settings.
Step 2 - Chat with the BotFather to create a new Bot and get API token

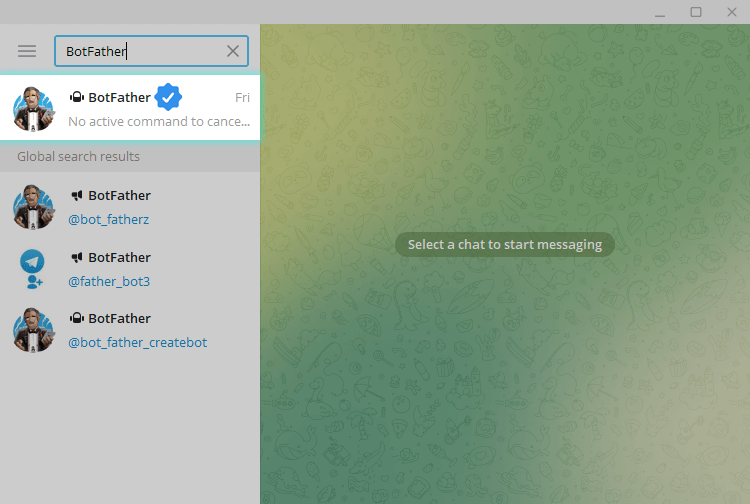
Inside your Telegram App, you need to search BotFather username and start a conversation with him. ★ Official Telegram bots have a blue checkmark beside their name.
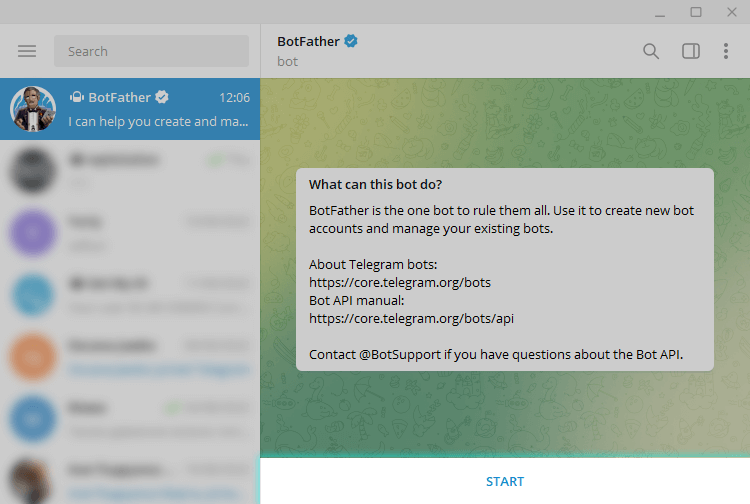
Click “Start” to activate BotFather bot or Give the start command to BotFather by typing /start You’ll see a list of commands that help you create, edit, and manage your bots.
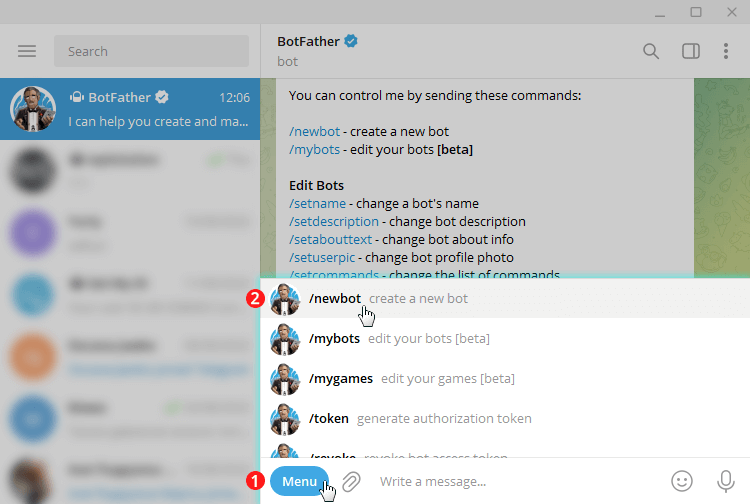
Since it’s your first time, you’ll want /newbot. Choose or type the /newbot command and send it. After giving the /newbot command, you get to pick a name and username for your bot.
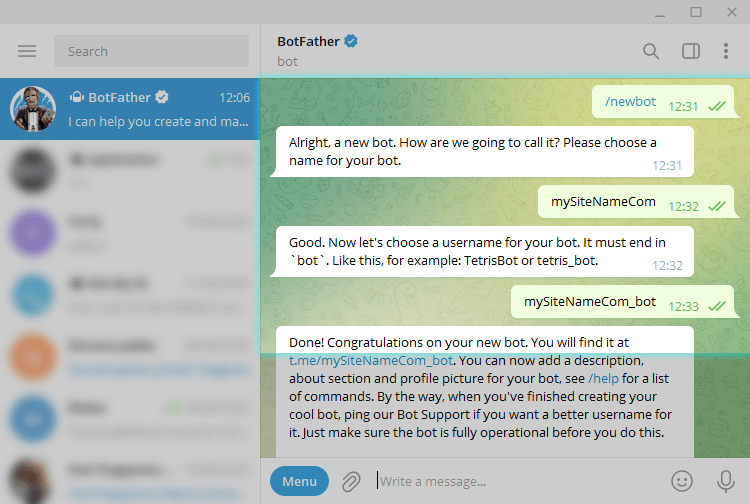
The username has to be unique, and memorable like your website address, for example “mySiteNameCom”. After you choose a suitable name the bot will be created.
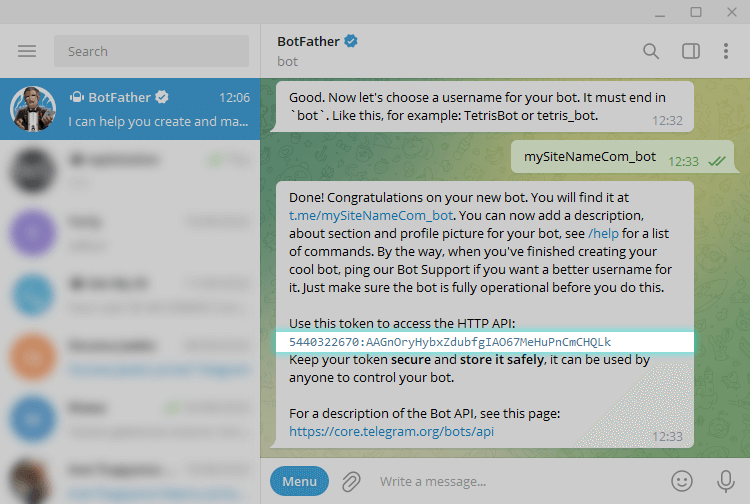
To connect a bot to your website you need a token. Every bot has its own API token, and you shouldn’t share it with anyone. Copy your token value and go to the Step 3.
Step 3 - Chat with the GetMyID to get your chat ID
Each user of Telegram gets a unique personal digital code, called Telegram user ID. User ID consists only of numbers and is static. It is automatically generated within Telegram and is attached to the user’s page (group, chat, channel) at the moment of registration. User ID allows users to connect with each other, join groups, use bots, and read feeds. Besides, you can’t just look it up in the settings or find it anywhere on your page at all. But then, what to do? You’ll have to resort to additional tools to find it.
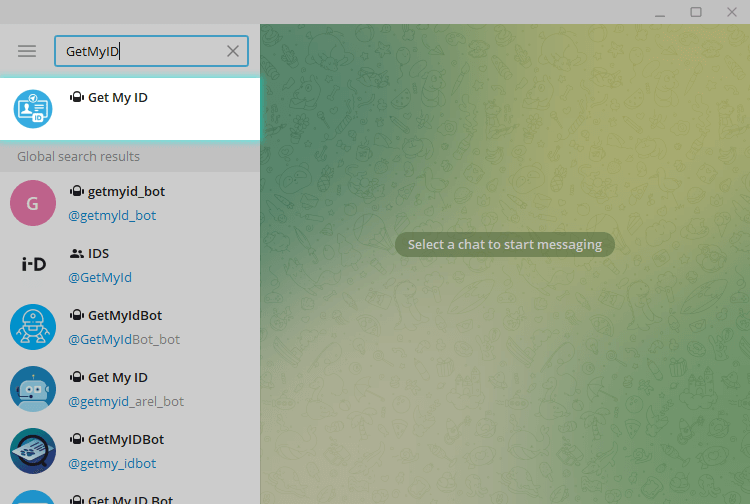
Inside your Telegram App, you need to search GetMyID username and start a conversation with him.
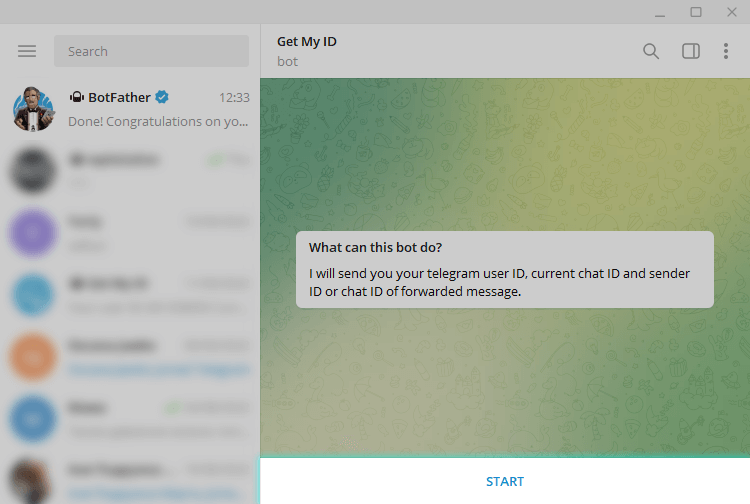
Click “Start” to activate GetMyID bot or Give the start command to GetMyID by typing /start
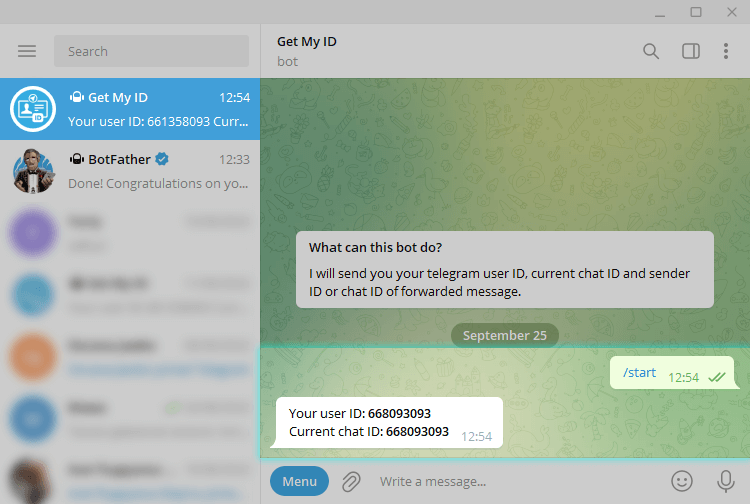
The next message the bot will send the ID identifier. The bot can be used an infinite number of times if the dialog is lost.
Step 4 - Connect your Bot on the webSite with WPS Telegram plugin

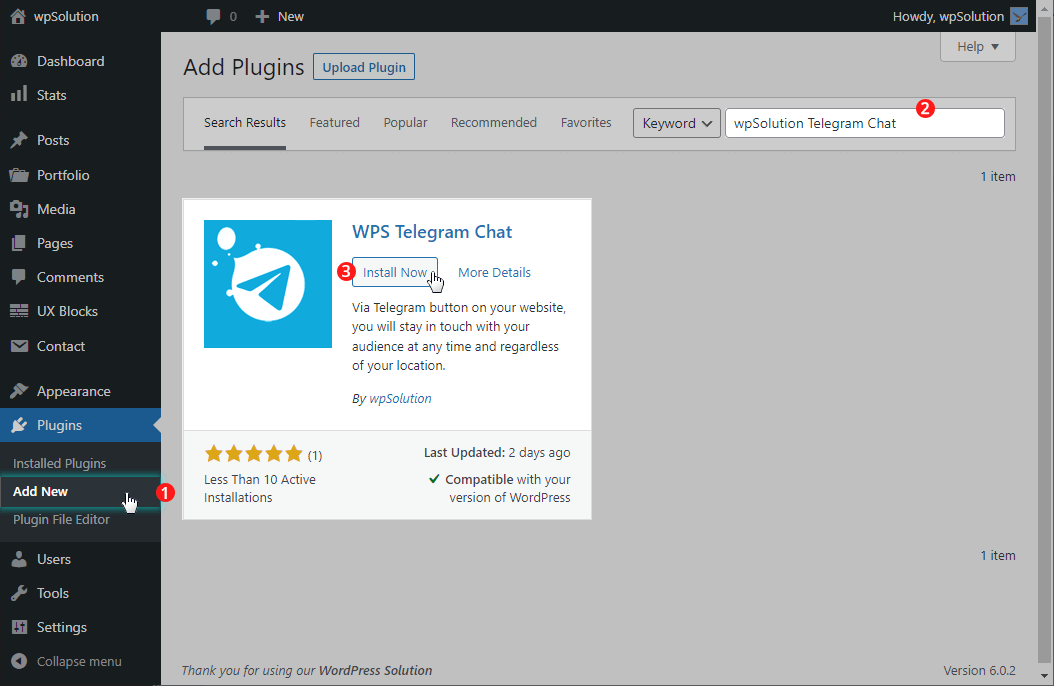
Go to your WordPress admin dashboard, then find the Plugins menu. Click on Add New and search for “wpSolution Telegram Chat“. Install and Activate the plugin through the Plugins menu in WordPress.

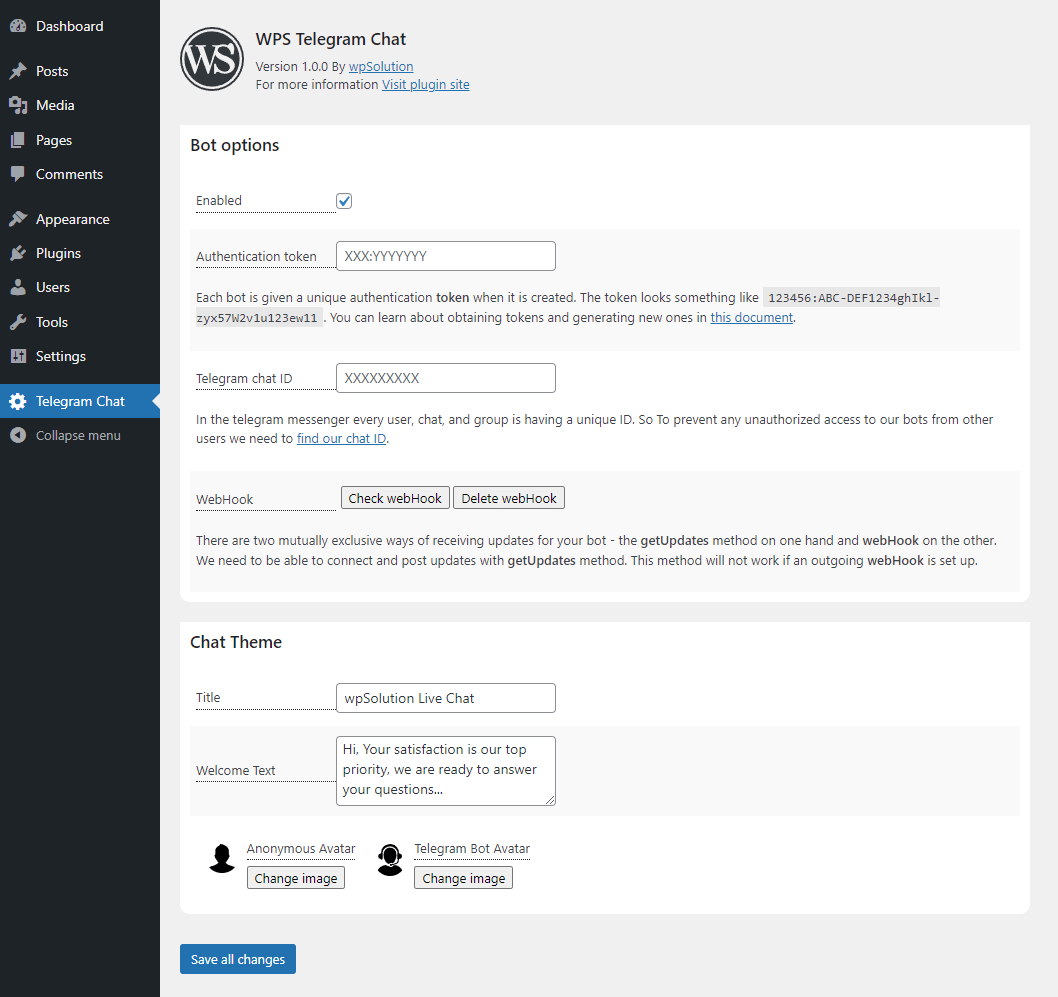
Click the Telegram Chat menu on the left.
Set the checkbox to Enabled.
· Enter your API token from BotFather, Step#2
· Enter your chat ID from GetMyID bot, Step#3
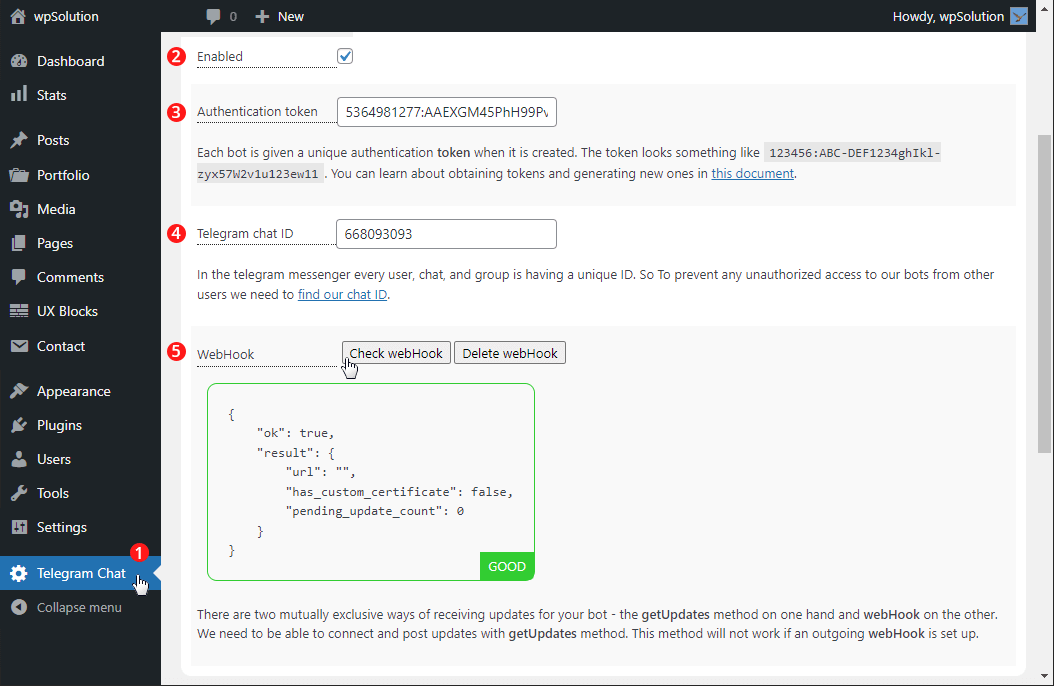
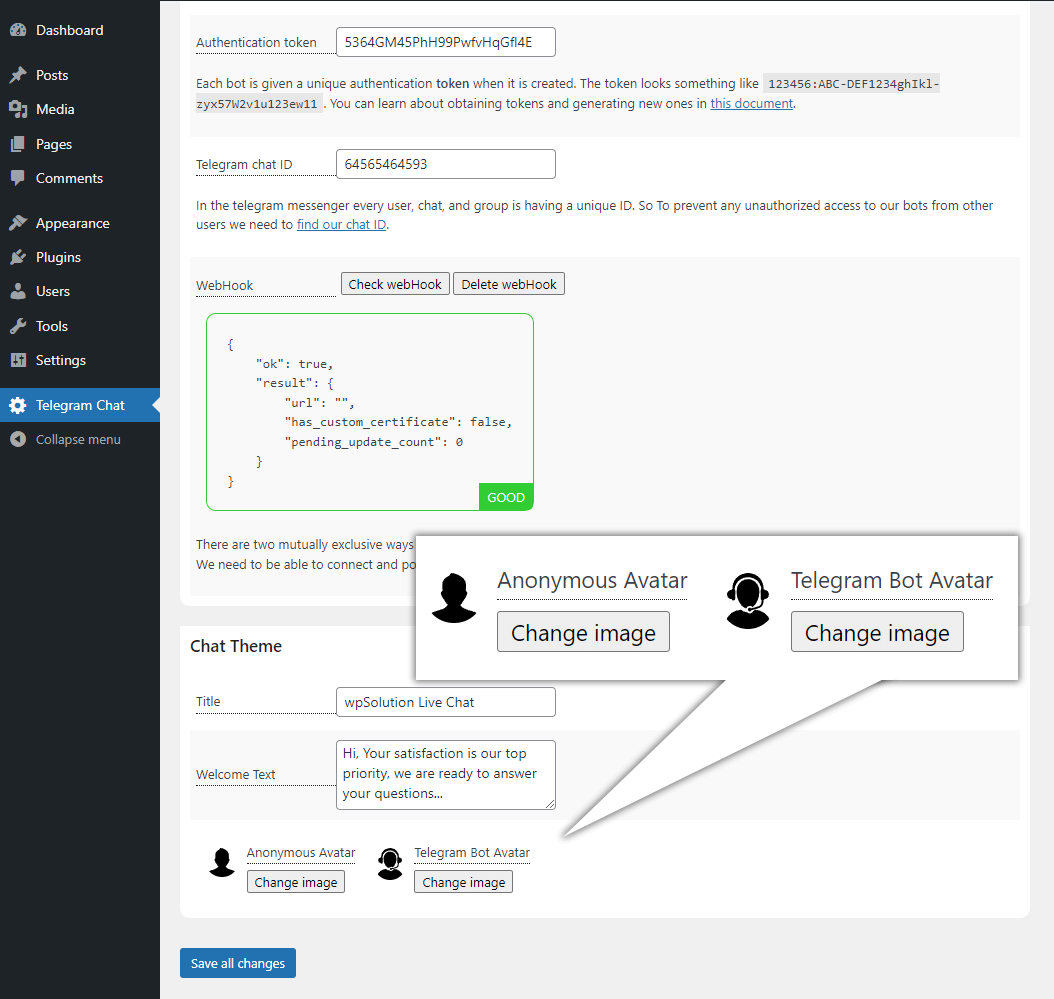
Click Check webHook button. If the settings are correct, you will see the info box with a green frame labeled GOOD.

Check the rest of the settings, title and welcome text of the chat form, etc… Save your settings.
Step 5 - How to Receive and Send messages
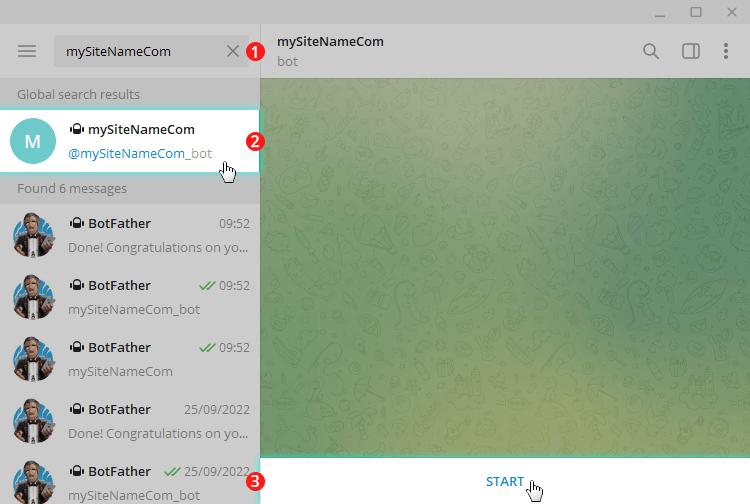
Inside your Telegram App, you need to search your Bot by the name you created in Step#2 and start a conversation with him.
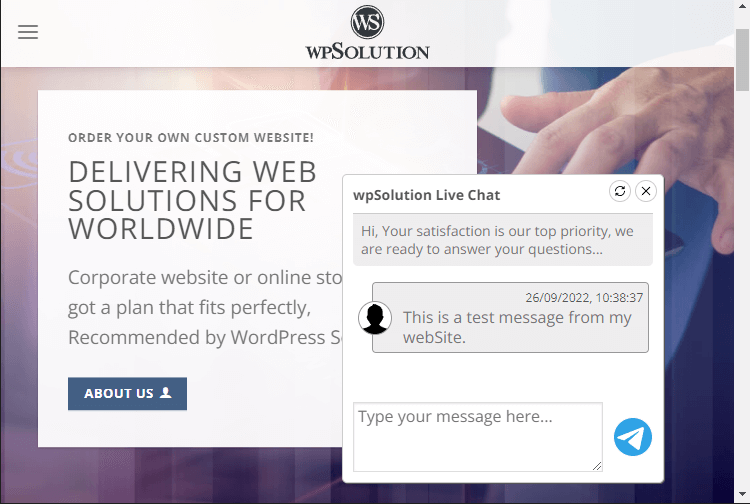
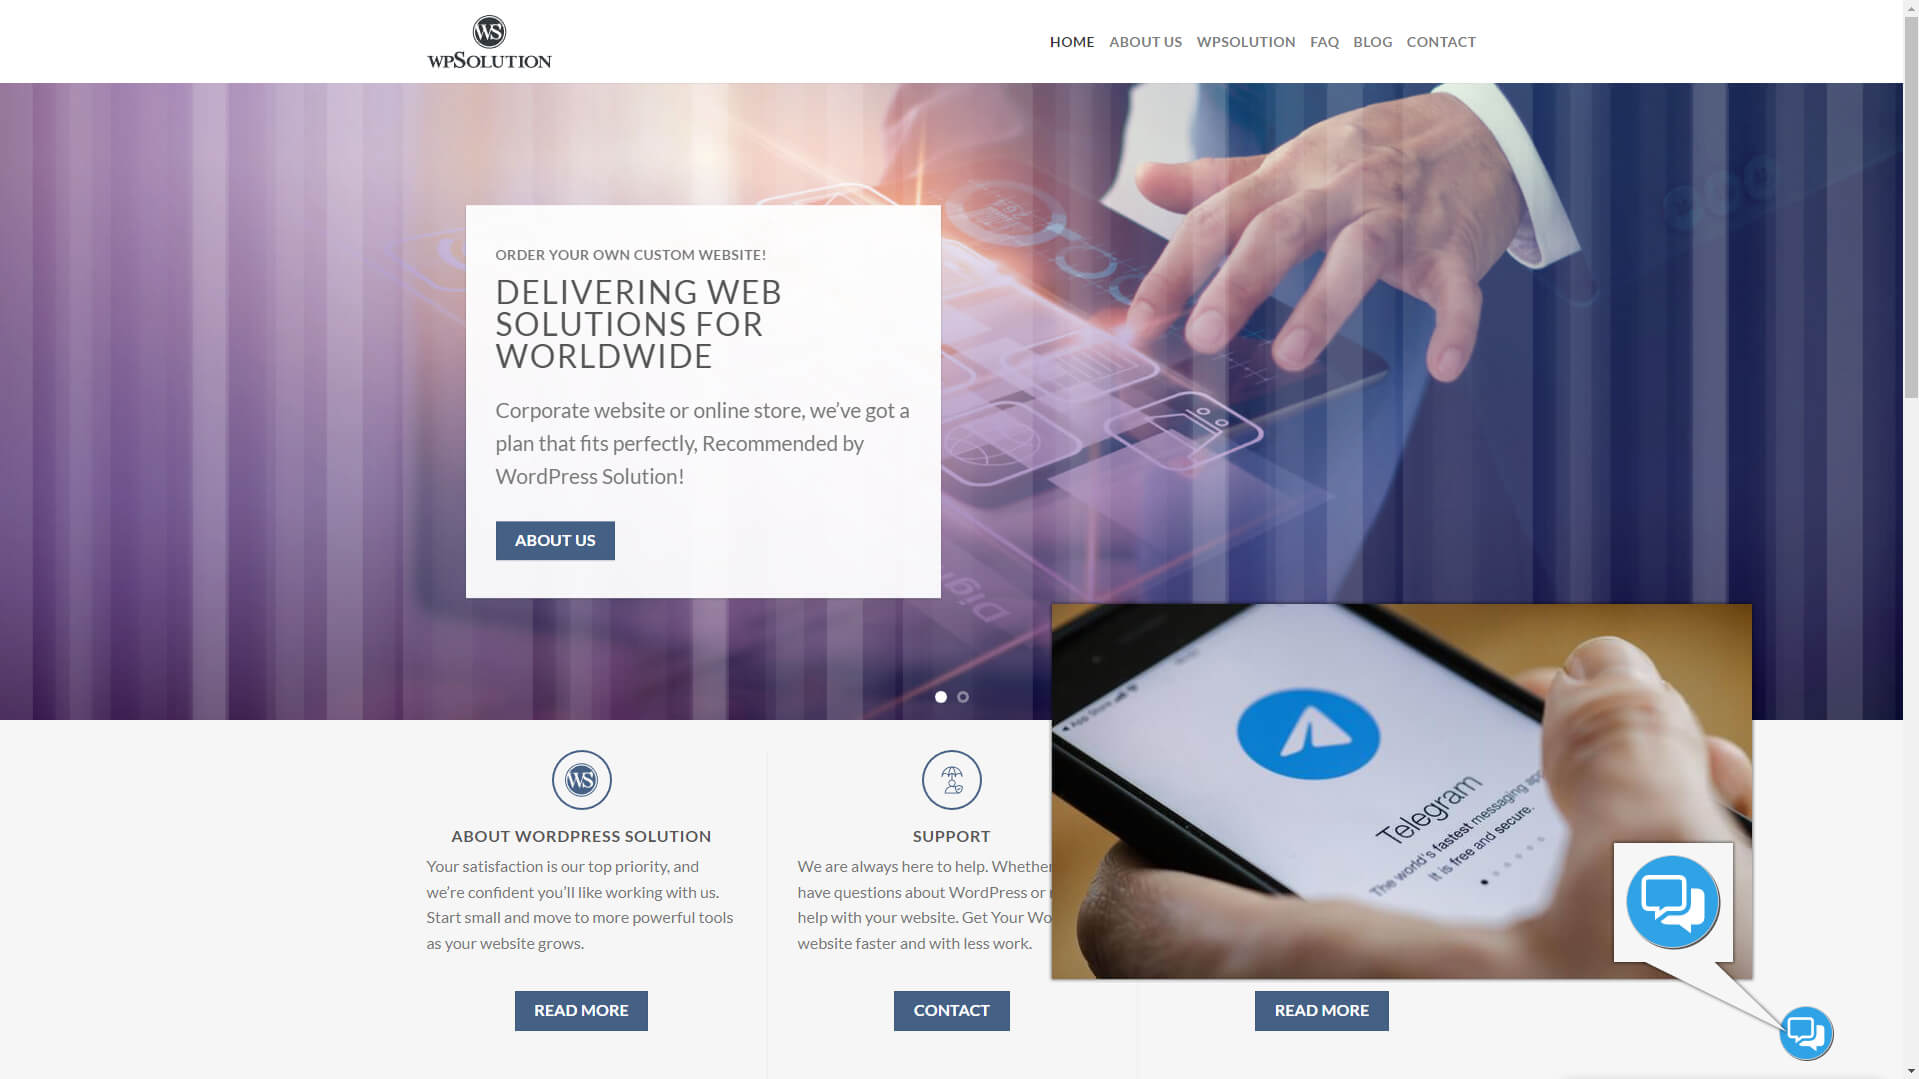
Go to your webSite with connected and configured WPS Telegram Chat plugin, Step#4. Send a test message from your webSite.
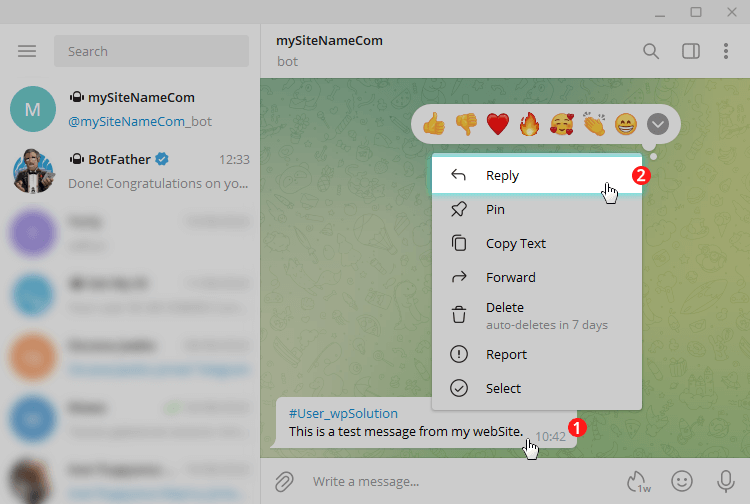
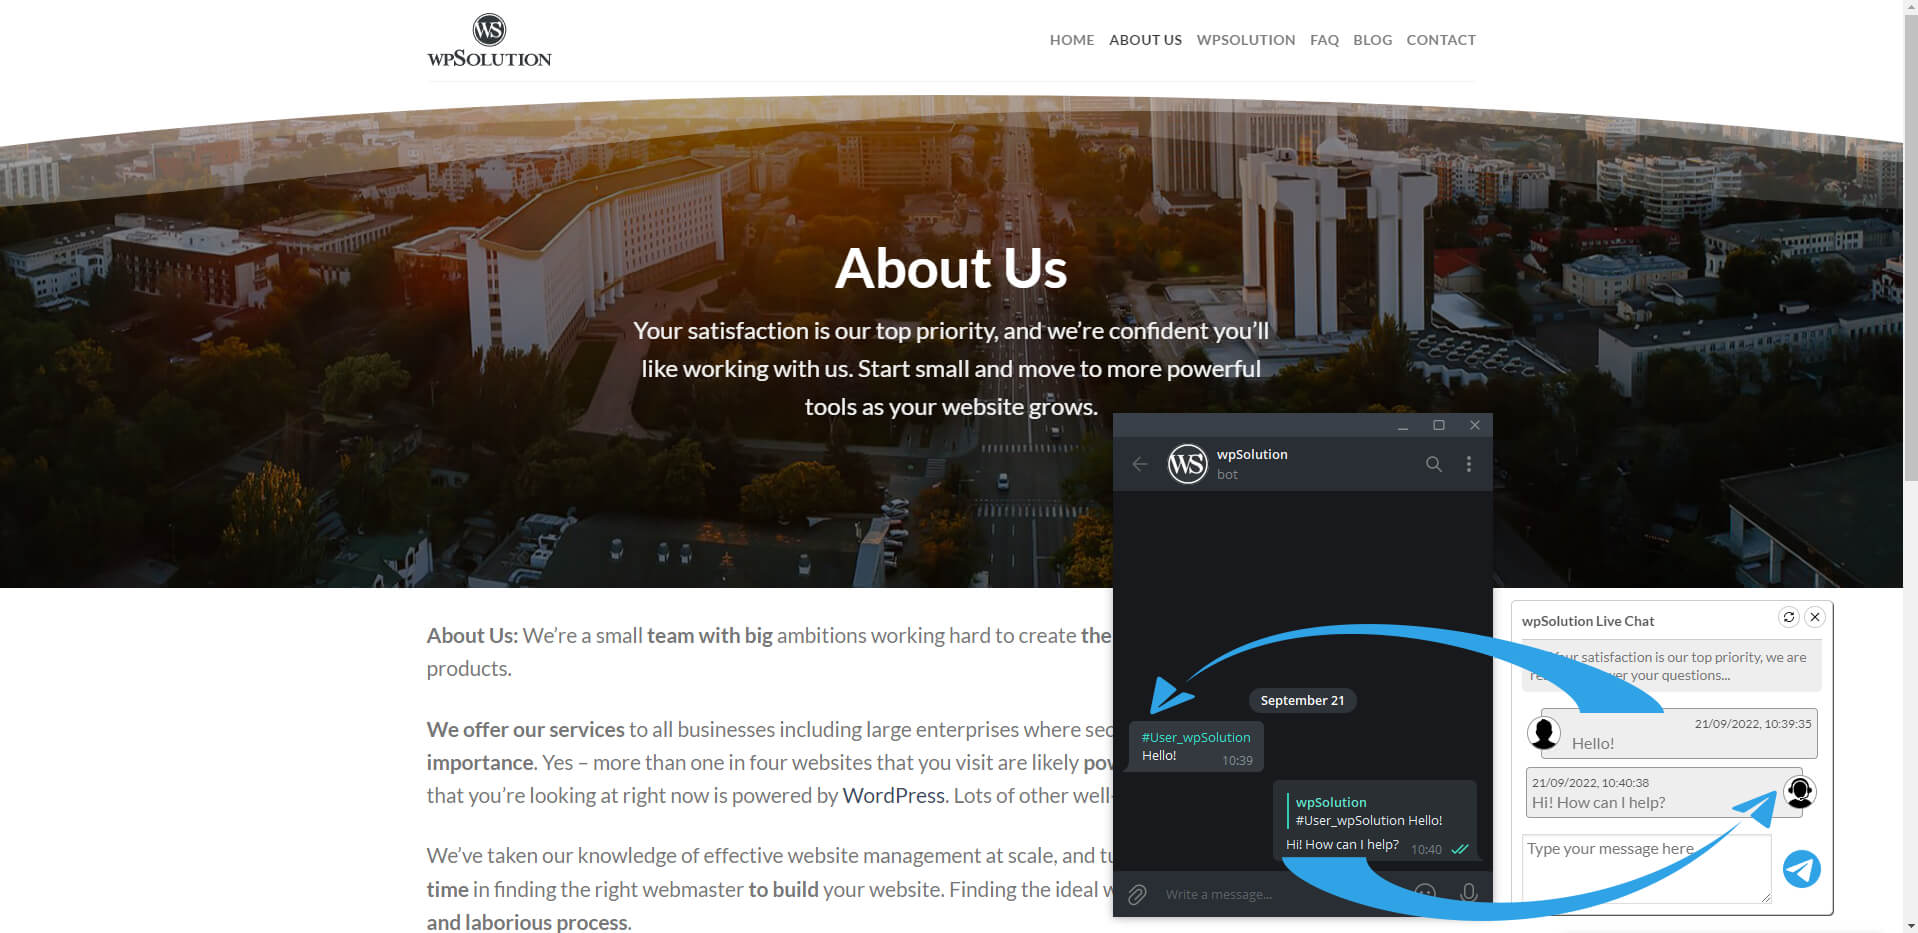
To answer to a received Telegram message, you need to call the context menu and click the Reply item. Otherwise, the message will not reach.
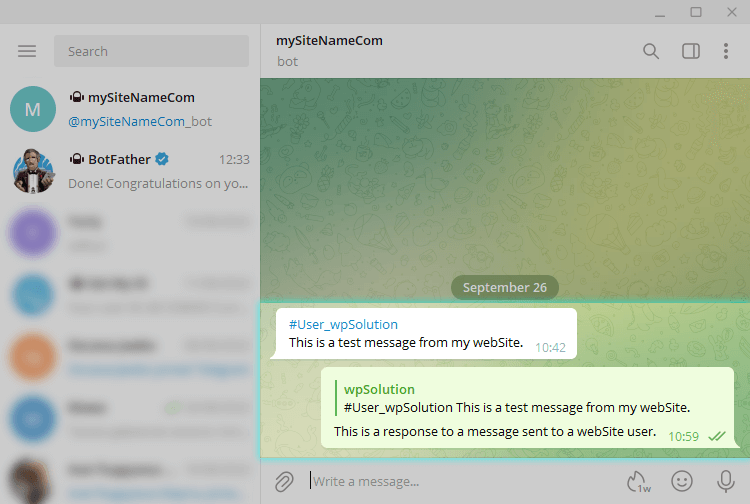
Your response from Telegram App to the webSite user should look something like this…
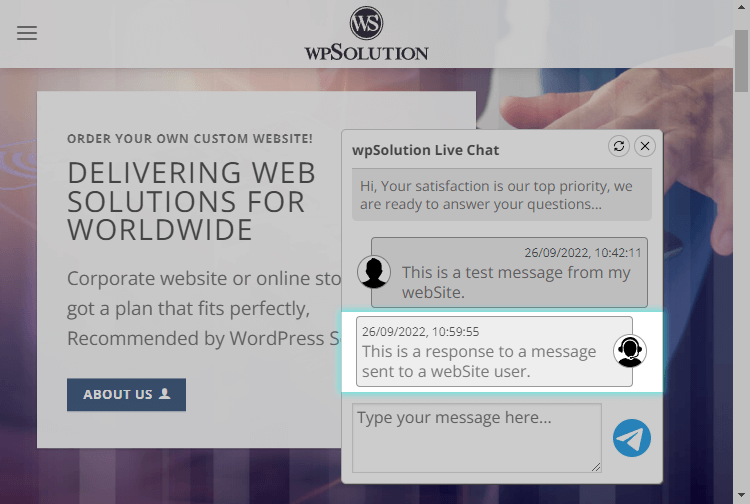
Check if the message has arrived on the webSite. Attention, messages on the webSite are updated only when the webSite tab is active. All Done!
Chat CSS Customize


Below is a list of CSS selectors for our chat layout:
- body #wps-telegram-chat
- body #wps-telegram-chat-update
- body #wps-telegram-chat-header h5
- body #wps-telegram-chat-app a
- body #wps-telegram-chat-close
- body #wps-telegram-chat-welcome p
- body #wps-telegram-chat-content
- body #wps-telegram-chat-content .outgoingMessage
- body #wps-telegram-chat-content .incomingMessage
- body #wps-telegram-chat-content .info
- body #wps-telegram-chat-content .error
- body #wps-telegram-chat-input
- body #wps-telegram-chat-textarea textarea
- body #wps-telegram-chat-send i
How to use it?
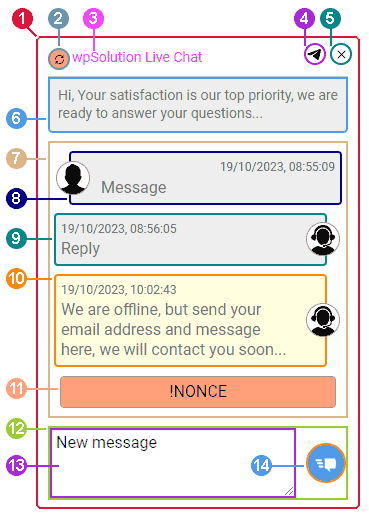
You should know a little CSS or study it Read more… For example, we want to change the color and size of the chat title (point 3 in pic above). This applies to the selector from point 3 of list, copy it and make a CSS declaration block, below is our example:
body #wps-telegram-chat-header h5{
   color: #ff00ff; /* change text color */
   font-size: 18px; /* change text size */
}
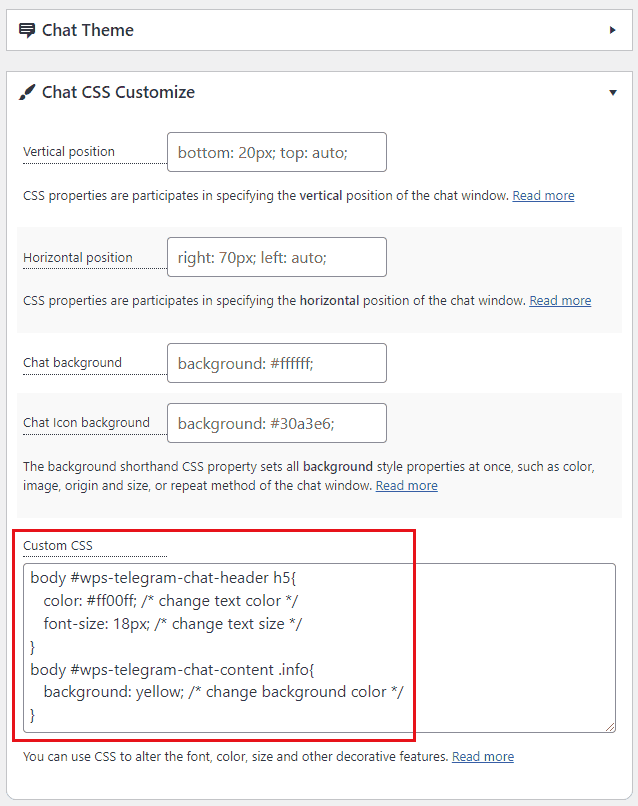
Additionally, let’s change the background color of the offline message. This is point 10 from our list.
body #wps-telegram-chat-content .info{
   background: yellow; /* change background color */
}
Insert the created css styles into the custom CSS of the chat settings and save.
Proxy script CloudFlare

How to Deploy
Go to CloudFlare Dashboard and sign up/in. If you are new to CloudFlare, it may ask you to add a domain. If you don’t want to add a domain, just open the above link again. On the Dashboard goto “Workers & Pages” and verify your email if needed. You will be asked to create a Workers subdomain. Enter the subdomain you want.
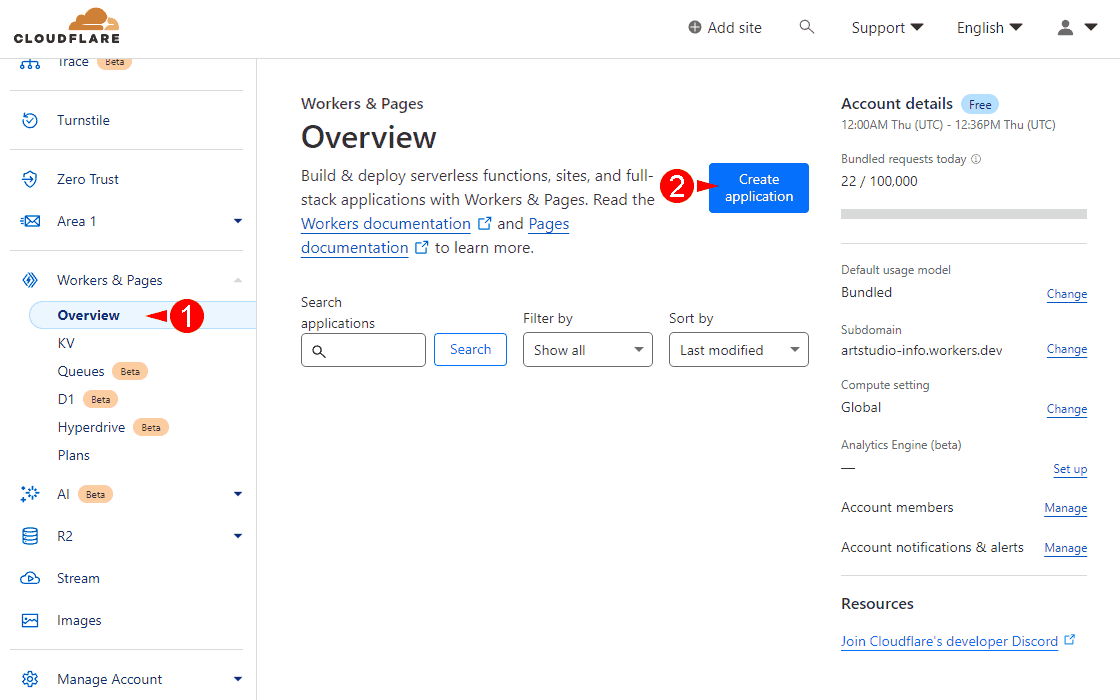
Select Workers & Pages
Click on Create application
or Edit if you have already created one
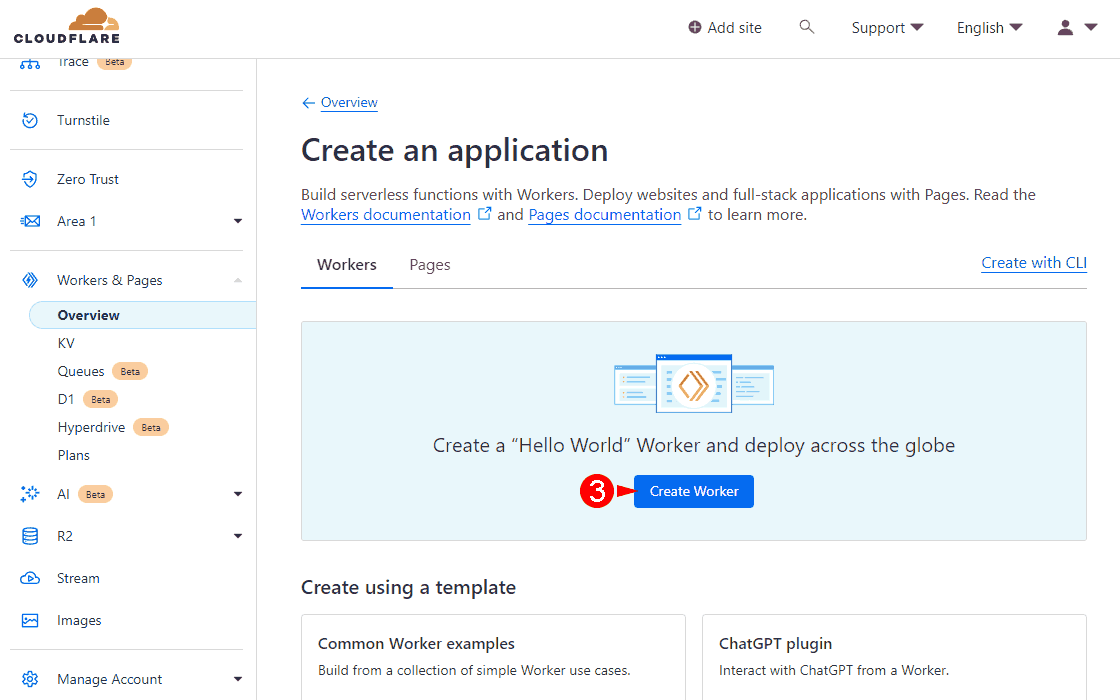
Click on Create Worker to proceed
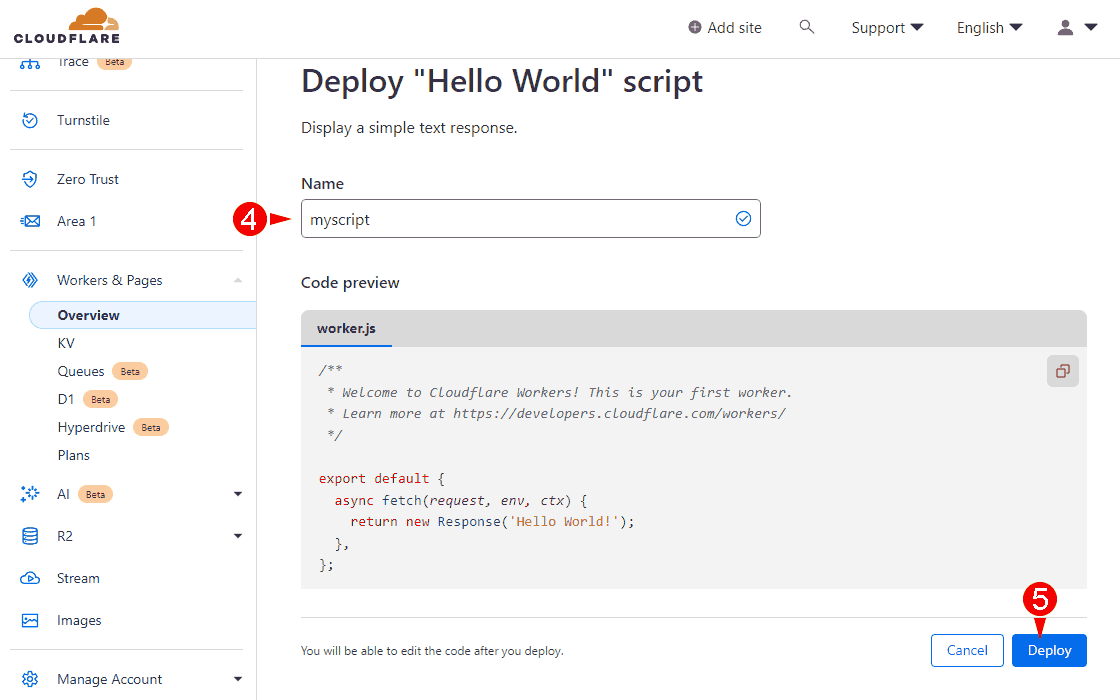
Change script name
Click on Deploy
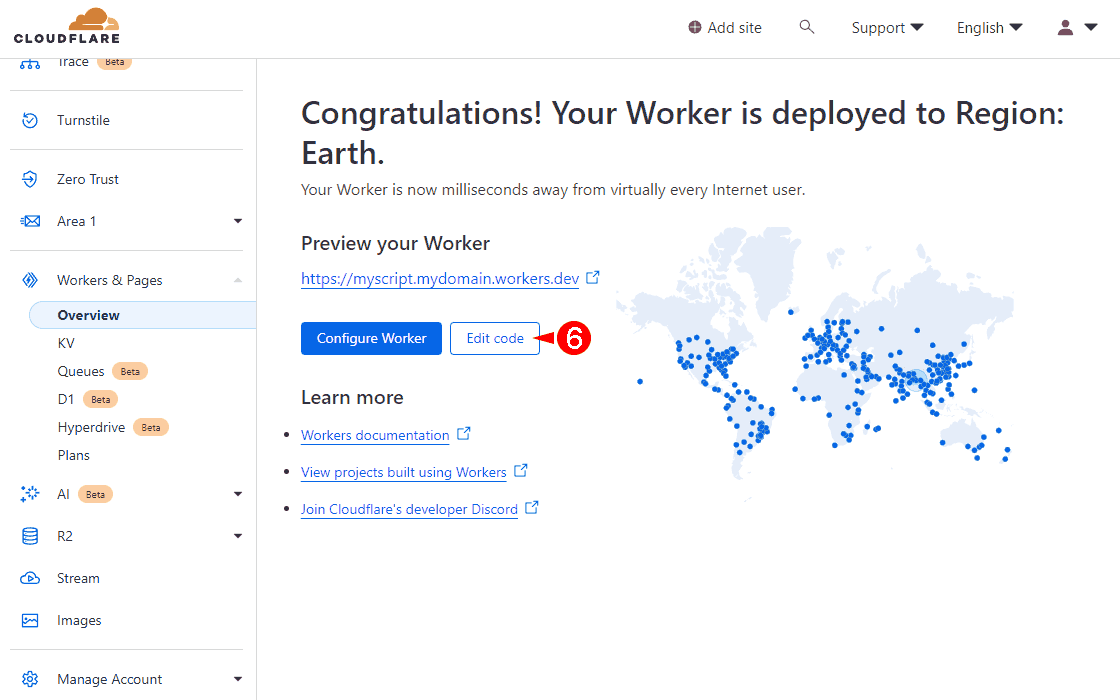
Click on Edit code
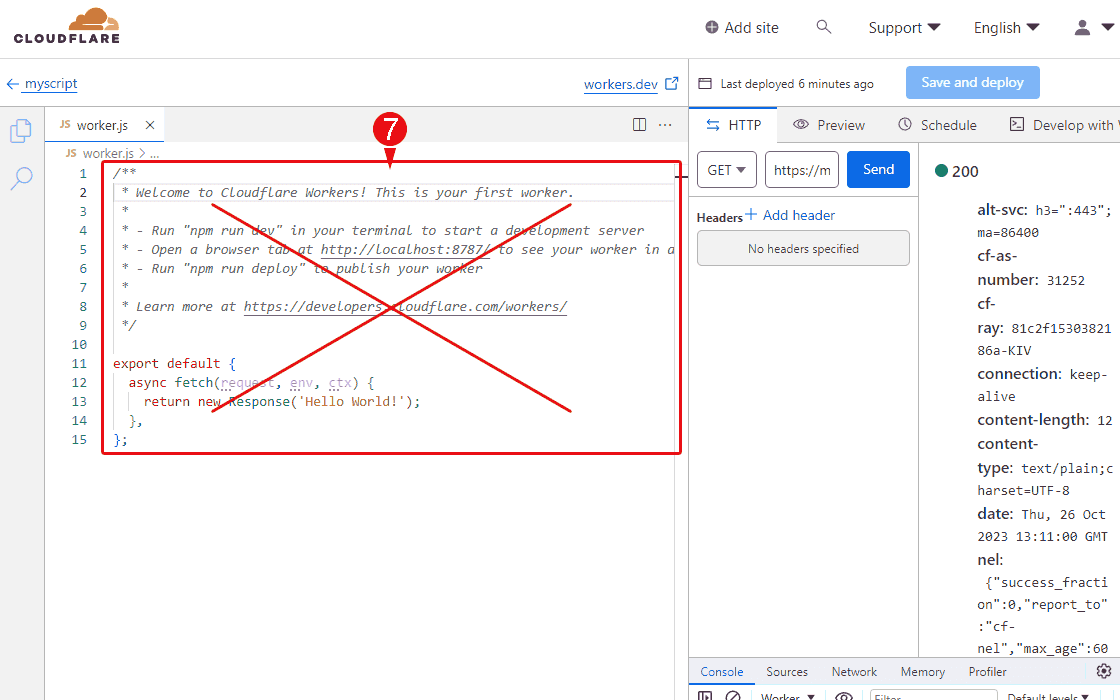
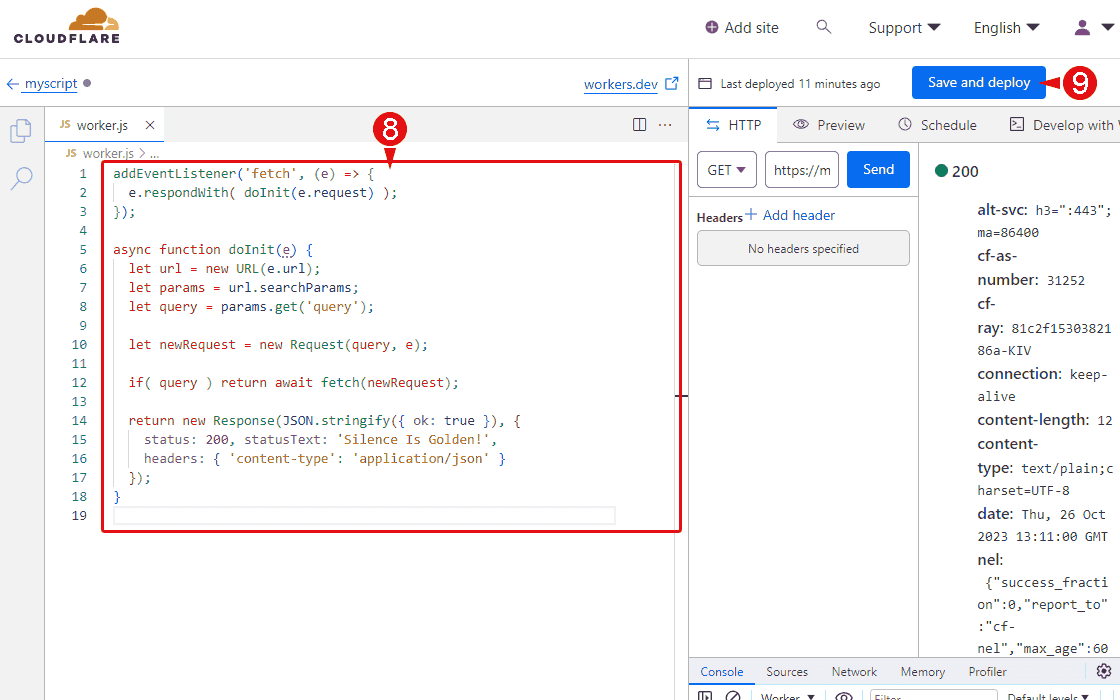
Copy and replace the code given in the code editor with the code below:
addEventListener('fetch', (e) => {
	e.respondWith( doInit(e.request) );
});

async function doInit(e) {
	let url = new URL(e.url);
	let params = url.searchParams;
	let query = params.get('query');

	let newRequest = new Request(query, e);

	if( query ) return await fetch(newRequest);

	return new Response(JSON.stringify({ ok: true }), {
		status: 200, statusText: 'Silence Is Golden!',
		headers: { 'content-type': 'application/json' }
	});
}

Copy the final URL click on Save and deploy, script has been updated and you are ready to use script for WPS Telegram Chat
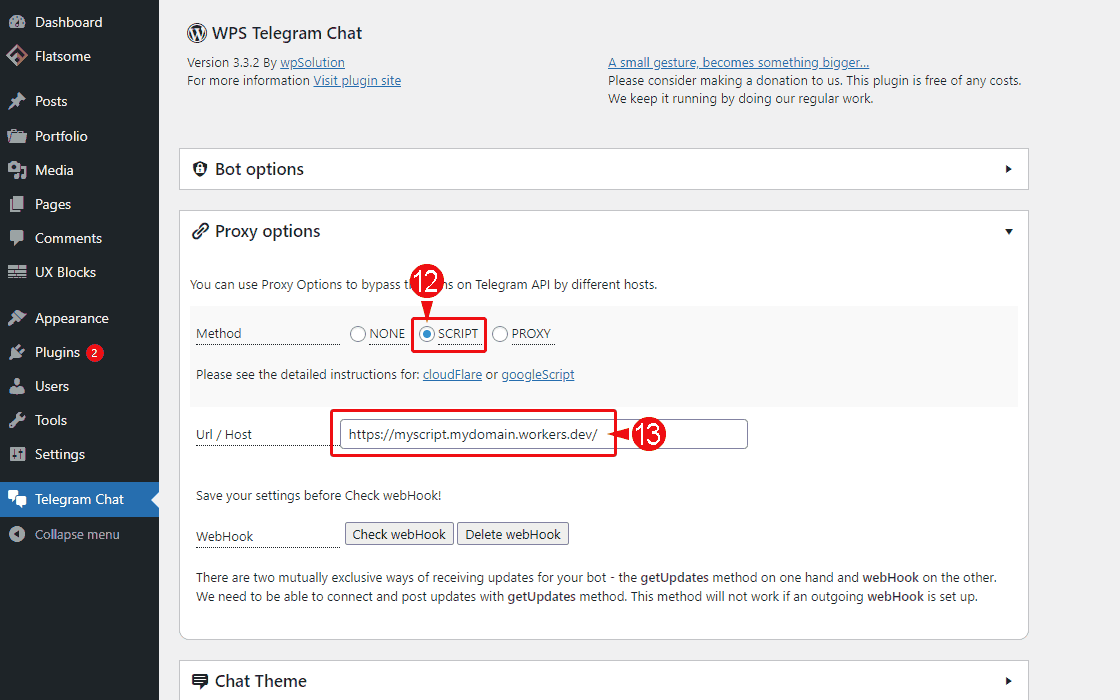
Last, we need to link your final URL in the Proxy options
Proxy script Google Apps
How to Deploy
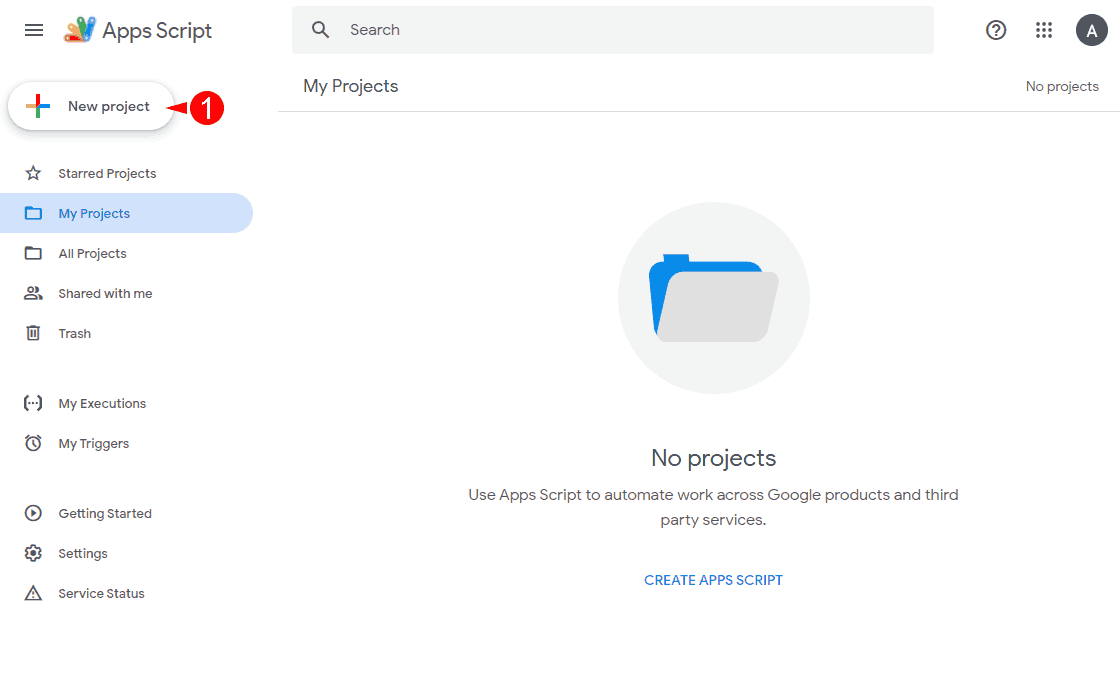
You can use this script to bypass the bans on Telegram API by different hosts. Go to script.google.com and sign up/in.
1) Click on New project
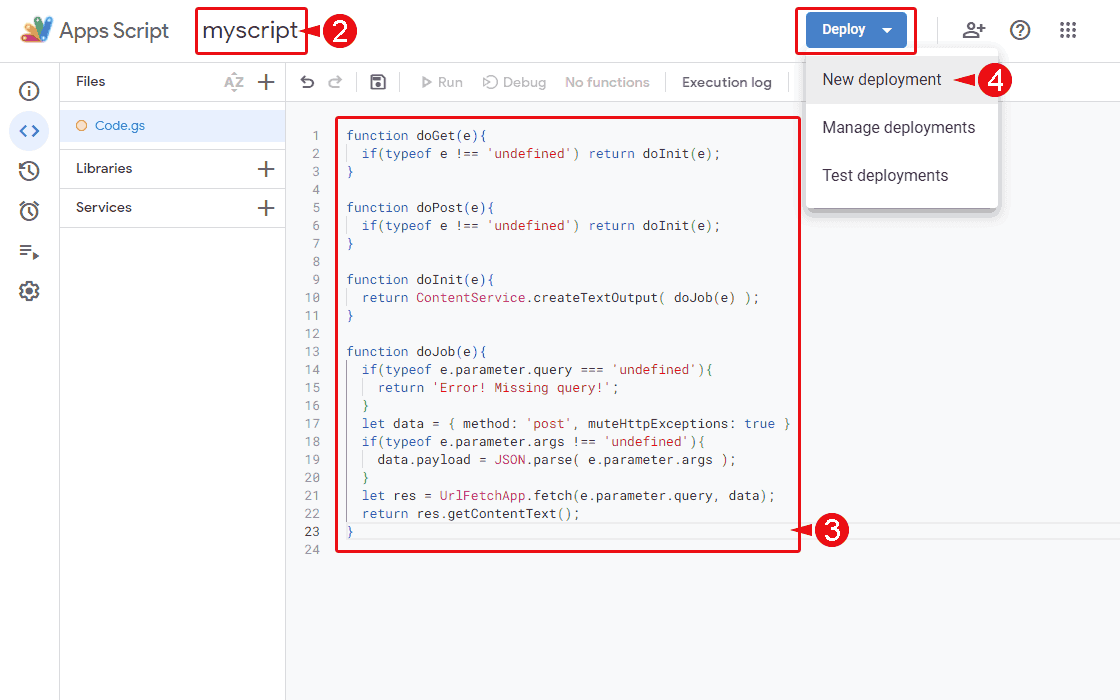
2) Give the project a name you wish, for example myscript
3) Copy and replace the code given in the code editor with the code below
4) Click on Deploy at the top and select New deployment and it will open a popup
function doGet(e){
  if(typeof e !== 'undefined') return doInit(e);
}

function doPost(e){
  if(typeof e !== 'undefined') return doInit(e);
}

function doInit(e){
  return ContentService.createTextOutput( doJob(e) );
}

function doJob(e){
  if(typeof e.parameter.query === 'undefined'){
    return 'Error! Missing query!';
  }
  let data = { method: 'post', muteHttpExceptions: true }
  if(typeof e.parameter.args !== 'undefined'){
    data.payload = JSON.parse( e.parameter.args );
  }
  let res = UrlFetchApp.fetch(e.parameter.query, data);
  return res.getContentText();
}
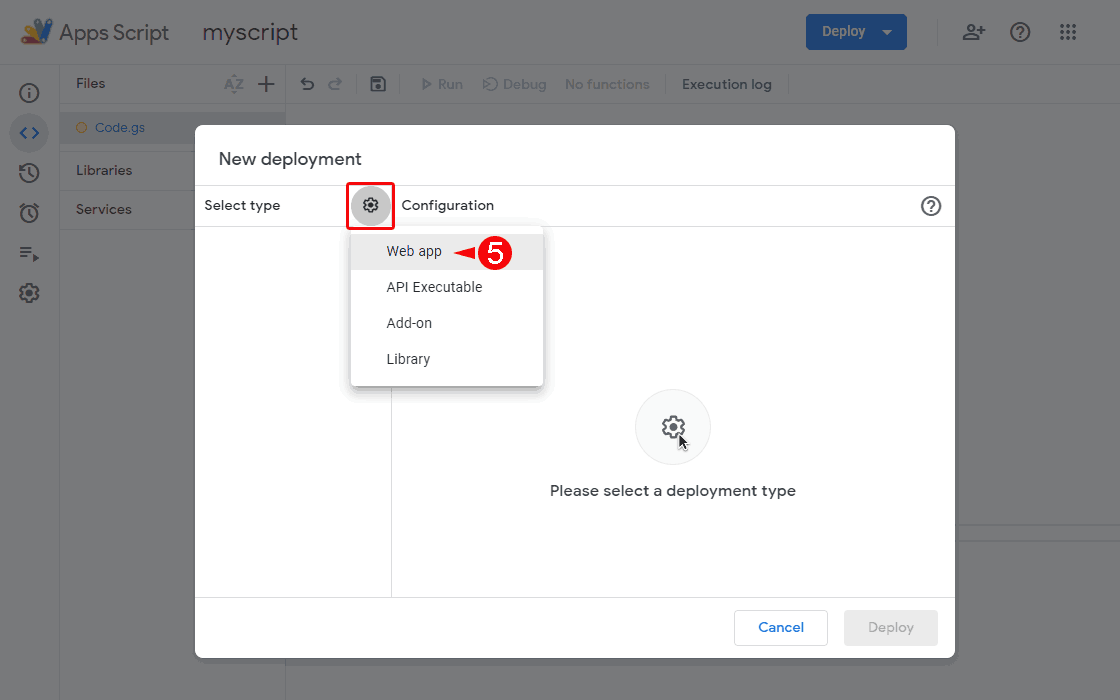
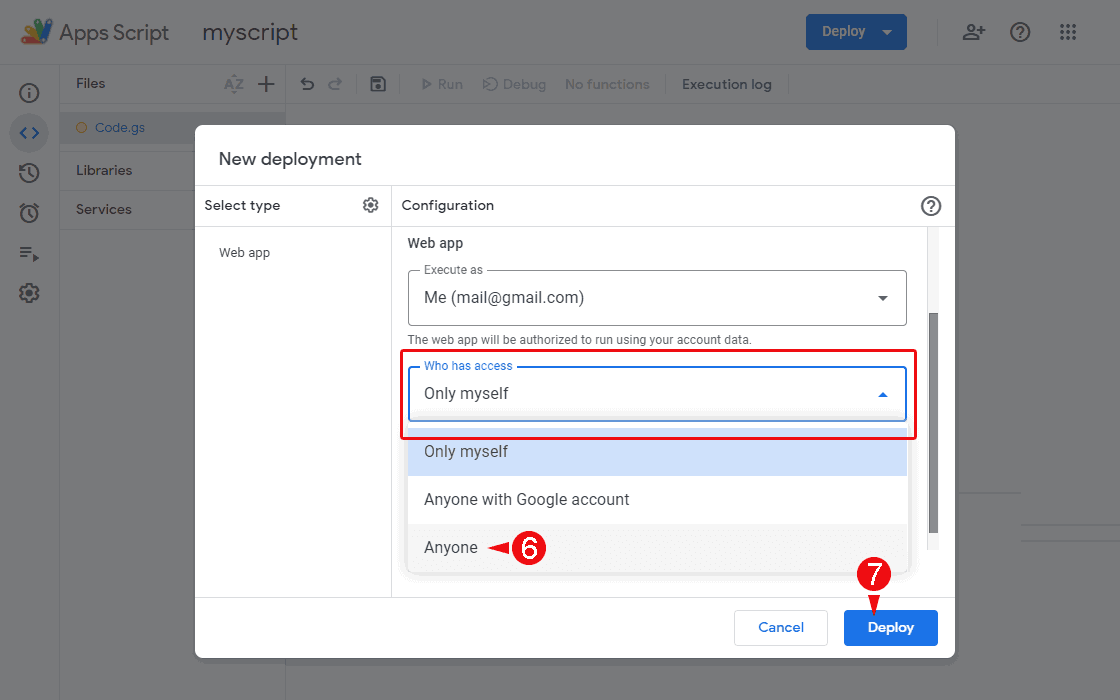
Inside the popup, click on Select type ⚙️ and choose Web app
– In Execute as, select Me (<your email>) IMPORTANT!
– In Who has access, select Anyone IMPORTANT!
Click on Deploy

Click on Authorize access to open the Authorization box
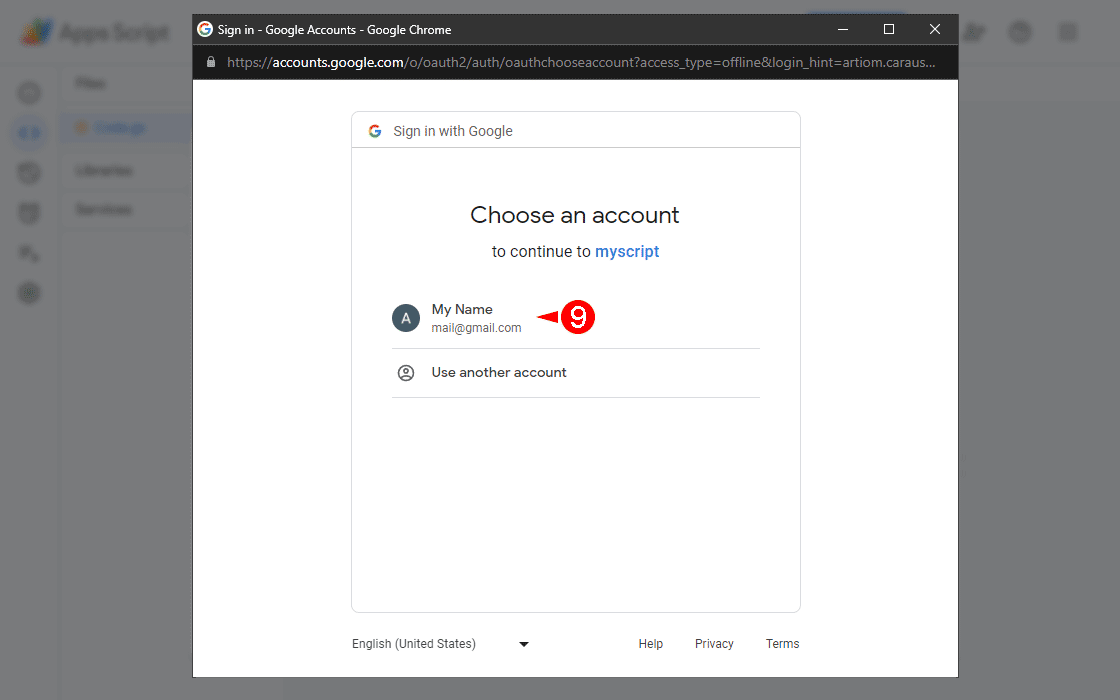
In the popup window select your Google Account
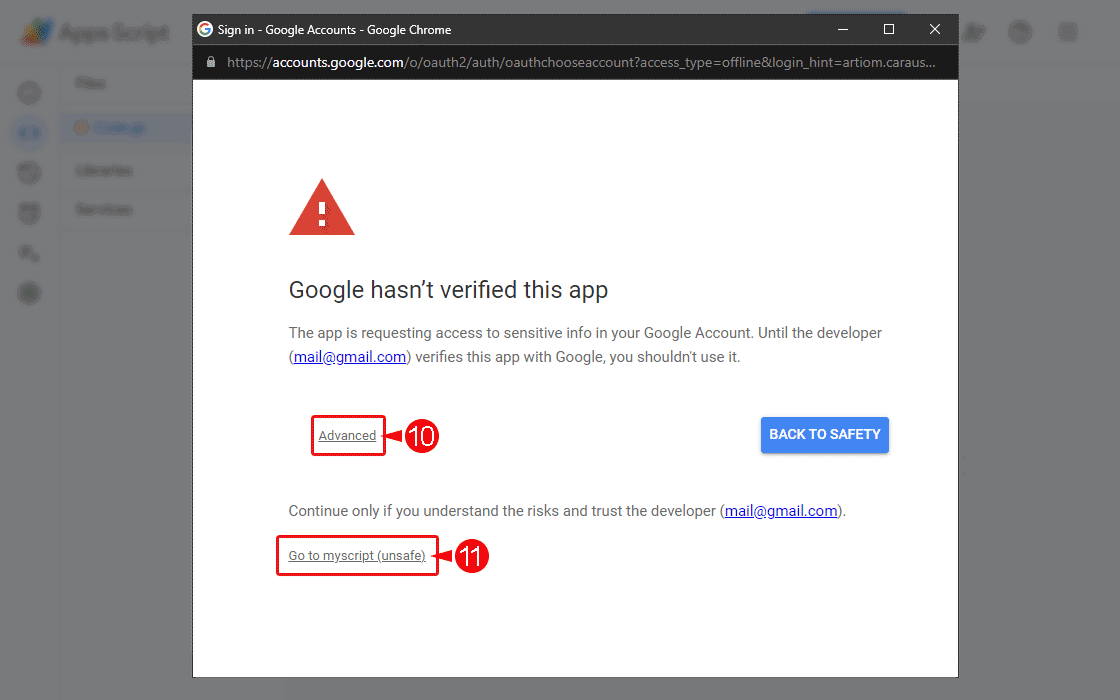
If you see a warning “Google hasn’t verified this app”, it is fine to click on Advanced
Click on Go to <app name> (unsafe)
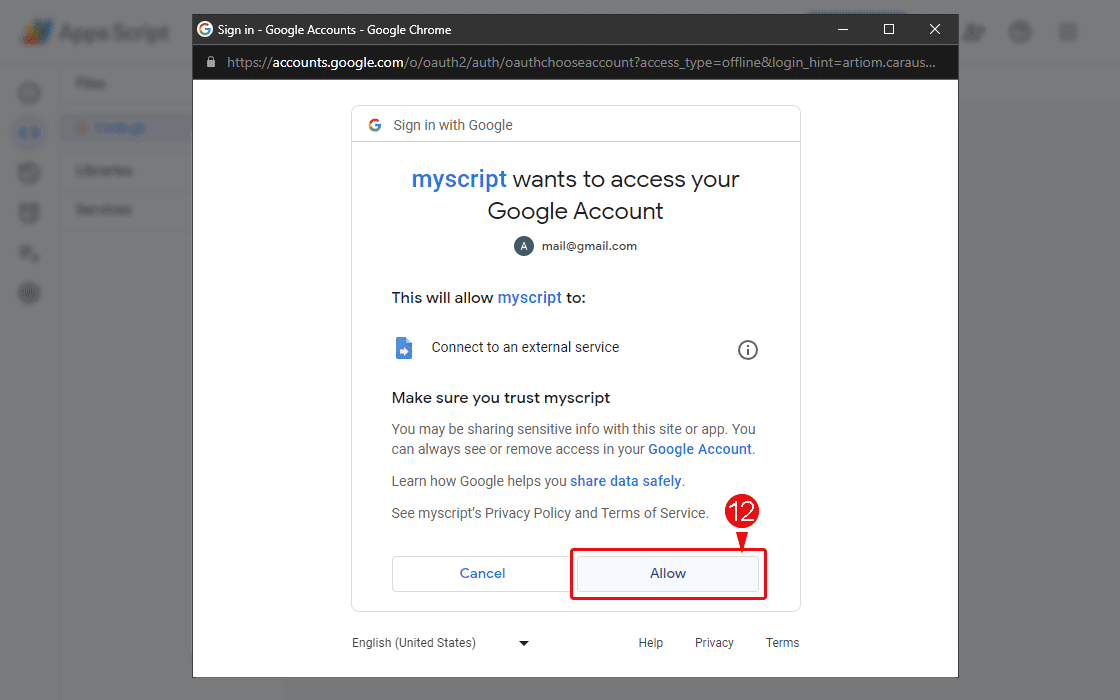
Click on Allow
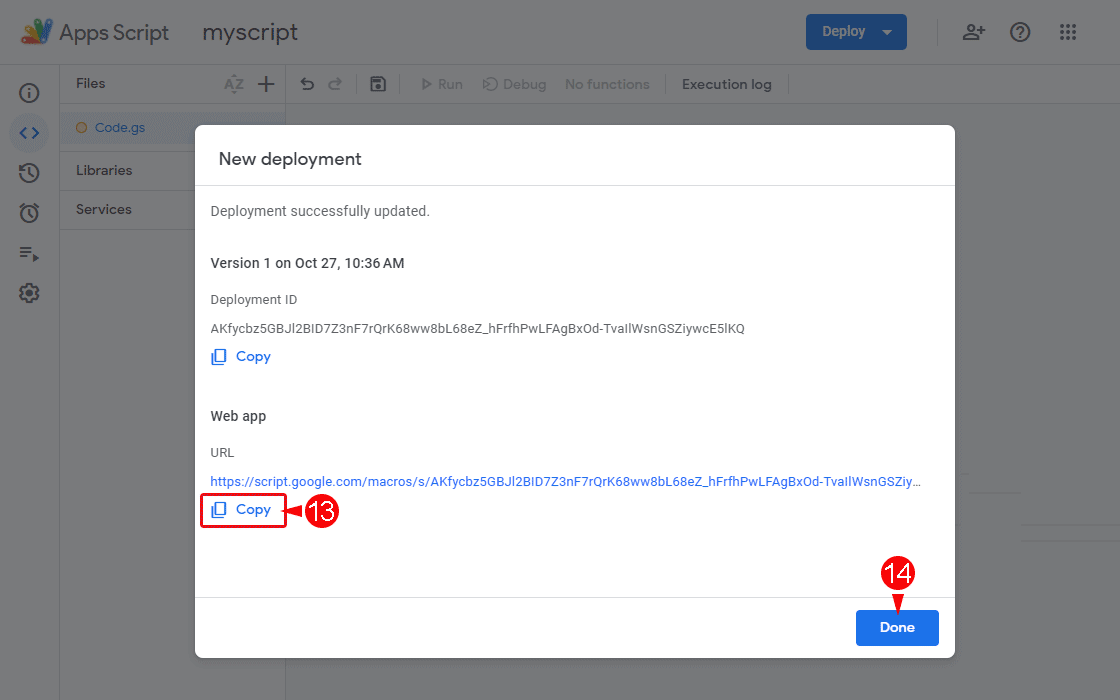
After redirect, you should see Deployment successfully updated
Click on Copy and you are ready to use script for WPS Telegram Chat
*
Last, we need to link your final URL in the Proxy options
== Changelog ==
= 4.x.x =
Release date: Octomber 27th, 2023
* Tested with WordPress 6.7
* Minimum version of PHP 7.0
* Improved storage of temporary data
* Troubleshooting PHP warnings
* New “Proxy options” for Bypass the ban on Telegram
* Supports Cloudflare or Google Script as proxy
* Supports other proxies by PHP
* Added URL parameter wpschat=fullscreen this is convenient for opening the chat in full screen on mobile devices
* Updated cookie process
* Using Web Worker to receive messages in inactive tabs
* Blinking site favIcon in inactive tab when a new message arrives
* Play notification sound when a new message arrives
* New setting “Required fields” asks for Username, Email or phone before sending a message.
* Customize one of the preset custom styles
* Two custom styles
* After sending the message, calls the getUpdate method
* The service info from the console is hidden
* Use the parameter wpschat=debug for debugging
* Minor improvements, code refactoring
* Improved compatibility with PHP 8.2 or higher
* Admin can мute sound for a new chat message.
* Opportunities for developers. Developers can use custom hooks to extend the plugin’s capabilities.
‘wps_after_send_message’ – register a callback function to handle submitted data
‘wps_after_get_response’ – register a callback function to handle response data
= 3.x.x =
Release date: May 1st, 2023
* New option “Telegram Link”
* New option “Only on specific pages”
* New option “Placeholder” text, specifies a short hint like “Type your message here…” in the input field before the user enters a value.
* New option “Receive emails for the site Admin into Telegram App”
* Customize your chat with custom CSS styling
* Added a shortcode to insert a contact form into a WordPress post or page, which will send a message to the telegram bot instead of email.
* Added Ukrainian translation
* Added Russian translation
* Added Hotkeys: “Esc” – Closes the chat, “Ctrl+Enter” – Sends a message
* Fixed css for compatibility with Bootstrap
* Fixed a bug with duplicate responses
* Fixed a bug, if the chat is minimized, but a message arrives, then open the chat.
* Fix schedule bug if the site locale is different from English
* Hotfixes for PHP Warnings
* Small design changes
* Improvement user experience
* Improvements for translation
* Important update for Improvement performance
* Important update for compatibility PHP 7.0 or higher
* Other minor improvements
= 2.x.x =
Release date: October 23th, 2022
* New option “Offline Message”
* New option “Schedule”
If the user does not receive a response within the first minute and depending on the “Schedule” an “Offline Message” will be displayed.
= 1.x.x =
Release date: September 23th, 2022
* First release
* Live tested on real devices
* Integrated Spam Protection
* No bugs found